Building a multi-macOS install drive with DiskMaker X
In my line of work, I’ve found it useful to have a USB drive with installers for each version of macOS on separate partitions. Mine was originally stocked with installers for Lion through Catalina, and it worked well.
But then came the Great Certificate Expiration of 2019 which caused them all to simply stop working after October 24. (They would still boot, but the installer would claim it was damaged and refuse to proceed unless the system’s clock was backdated beforehand… and even then it wouldn’t always work for me.) But as Apple has since deigned to re-sign and post installers for Yosemite and later, I figured it was time to rebuild my universal installation drive from scratch, and record the process.
I’ve left the installers for 10.7, 10.8, and 10.9 off of this second iteration as re-signed versions of those weren’t posted, and because I like round numbers. I’ll probably dedicate an older hard drive to those later for my vintage Mac futzing.
Ingredients
- a 64GB USB 3.0 flash drive. An SSD with more capacity and/or a USB-C plug would be ideal, but this works for me right now.
- Disk Utility on a clean macOS High Sierra installation. Although I’ve fought with the new Disk Utility before, I used it for this as it’s what most everyone else is likely to use as well.
- several releases of DiskMaker X, a program I’ve used from the beginning (and even contributed to). This uses Apple’s createinstallmedia command under the hood.
- installers for Yosemite through to the latest macOS in your Applications folder. The most recent three are downloaded via the App Store; the rest are actually disk images containing installers that you run manually.
Creating the drive
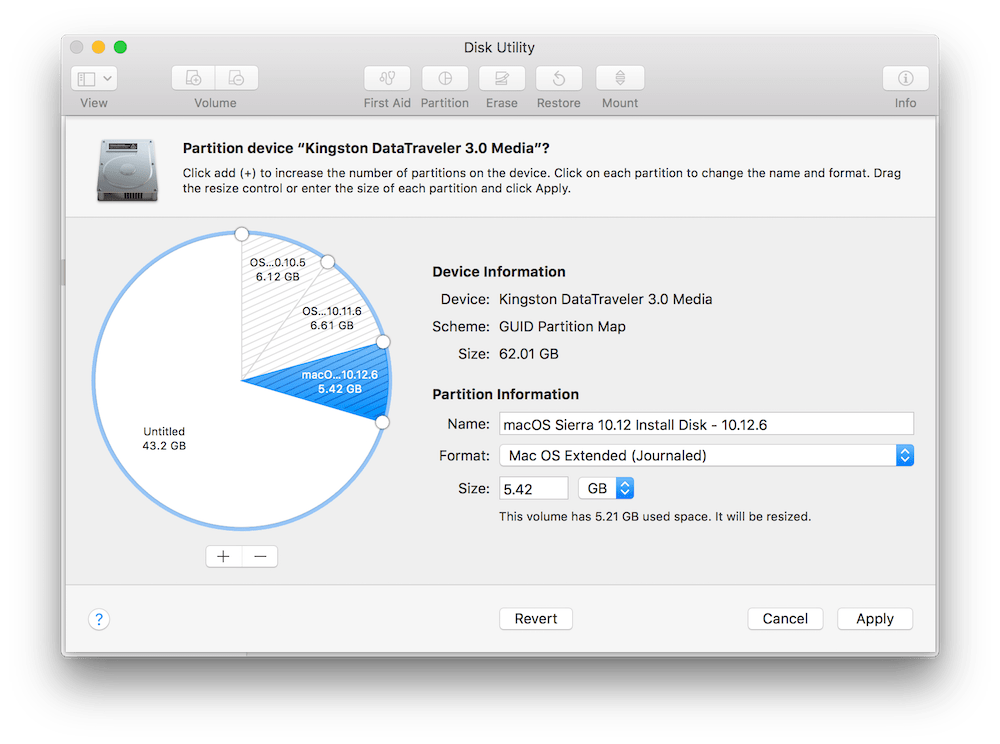
It’s possible to minimize the unused space on the drive by shrinking each partition after its installer has been loaded. I started by opening Disk Utility, selecting View > Show All Devices, selecting the inserted drive, and erasing it as “Mac OS Extended (Journaled)” using “GUID Partition Map”. Then for each OS X/macOS version, I would:
- run DiskMaker X (version 6 for Yosemite through Sierra; each subsequent release has its own dedicated app) to load the installer to the largest “Untitled” partition, remembering to select “Another kind of disk” so as not to wipe the entire drive.
- with the drive selected in Disk Utility:
- click [Partition]
- select the largest partition
- click [+] to split the partition
- select the other half of the newly-split partition (instead of “Untitled”)
- reduce it to its smallest possible size
- in the Size box, increase its value by 0.2GB to leave around 200MB of free space (although I doubt it’s actually needed)
- click [Apply] and wait for the shrinking to complete.
This was my drive after a few rounds:
I did find DiskMaker X 6 would occasionally skip setting a partition’s Finder window background, but this can easily be rectified by locating the appropriate background image within the app’s Contents/Resources/ directory and applying it via Finder’s View > Show View Options.
Sierra’s installer bug
With the Sierra installer, I ran into an issue where DiskMaker X would fail with the following error:
The disk could not be created because of an error: An error occured: -10006.
Finder got an error: Can’t set alias "Install macOS Sierra:Install macOS Sierra.app" to {425, 76}.
Using its createinstallmedia command also failed:
$ sudo /Applications/Install\ macOS\ Sierra.app/Contents/Resources/createinstallmedia --volume /Volumes/Untitled --applicationpath /Applications/Install\ macOS\ Sierra.app
/Volumes/Untitled is not a valid volume mount point.
Reports from others suggested that the issue was with the reissued installer itself, so I pulled the original Sierra installer out of my Time Machine backups and compared the two using FileMerge. The original’s version is 12.6.03, while the reissued installer’s version is 12.6.06. It turns out that to get the reissued installer working, all you have to do is open its Info.plist file and change the value for CFBundleShortVersionString from 12.6.06 to 12.6.03. This can be done with a single command using plutil:
sudo plutil -replace CFBundleShortVersionString -string "12.6.03" /Applications/Install\ macOS\ Sierra.app/Contents/Info.plist
after which DiskMaker X should run without issue.
Evidently, something within the reissued installer wasn’t updated to account for the new version number. As of this writing, this Apple support page is still serving the affected installer from this URL. I’ve used their feedback form to raise the issue with a link back to this post. (Update 2022-03: Looking at this Apple support article, it appears they’ve fixed the problem the Apple Way™ by removing all references to the Sierra installer.)
Custom icons in Startup Manager
Holding the Option key when powering on an Intel Mac brings up the EFI-based Startup Manager interface, which shows icons and names for all attached bootable volumes. When testing my completed drive, Startup Manager was showing all six partitions, but the ones for macOS 10.13 and later were only showing generic icons. I did some investigation, and what did I find? Yep, more macOS bugs.
A volume with a custom icon will have a hidden .VolumeIcon.icns file at its root. This file is in the ICNS format, which defines this list of image size specifications that such a file can contain any number of. Finder will display the largest size available in the file, but Startup Manager on a Mac with a non-Retina screen will display only the it32 size (128 x 128 @ 72ppi), while a Mac with a Retina screen will prefer the ic08 size (256 x 256 @ 72ppi) if available, falling back to the it32 size if not.
Opening each file in Preview (e.g. open "/Volumes/<volume name>/.VolumeIcon.icns" in Terminal) will show those files don’t contain Startup Manager’s required sizes. To fix, you could retrieve the custom volume icon from a ZIP archive contained within each DiskMaker X application’s Contents/Resources/ folder, open it in Preview, copy, and paste into the icon of each volume’s Get Info window. This will automatically generate a .VolumeIcon.icns file containing several sizes. (It also enables the custom icon flag for the volume, which you can set yourself with SetFile -a C /Volumes/<volume name>.)
But! You’ll get different results depending on which macOS version you’re running:
- macOS 10.12 and earlier generates these sizes:
ic10,ic09,ic08,it32,ih32,icsd(blank for some reason),il32,icsb(with wrong colours),is32 - macOS 10.13 generates only
ic10andic09 - macOS 10.14 generates
ic12,ic05,ic11,ic04(blank for some reason) - macOS 10.15 generates
ic10,ic14,ic09,ic13,ic08,ic07,ic12,ic11,ic05,ic04
This is why a custom volume icon pasted from an image using macOS 10.13 or 10.14 will not show in Startup Manager on any Mac, and if macOS 10.15 is used, it will show only on Retina display Macs. (Note that if you’ve copied a custom icon from another file using Finder, it will transfer all sizes of the original icon when pasting, rather then generating a new set of sizes.)
So, if you want to create your own volume icon file with the proper sizes and don’t have a pre-High-Sierra Mac on hand, you can still do so with iconutil.
Changing the name of a partition
If you change a boot partition’s name in Finder, you might notice that this change isn’t automatically reflected in Startup Manager. This is because the name it shows is actually an image that’s pre-generated by the bless command. You can customize the text by running bless manually, but to have it simply mirror the volume’s name in Finder, it’s quicker to:
- open System Preferences > Startup Disk
- select the modified partition
- click Back, Lock, or the Show All Preferences button to apply the change.
Doing so updates the .disk_label and (for Retina displays) .disk_label_2x files in the partition’s /System/Library/CoreServices/ directory.
It’s worth noting that a firmware update that shipped with macOS High Sierra added /.IABootFiles as a location for those files, but my testing didn’t find any cases where that posed an issue.
Preventing partitions from auto-mounting
Because it can take a while for macOS to properly unmount all the drive’s partitions when ejecting, I’ve prevented them from automatically mounting on my Mac by adding their UUID values to /etc/fstab. Using each partition’s Volume UUID from diskutil info "/Volumes/<volume name>" | grep "Volume UUID" or System Information’s Hardware > Storage, I added several lines of UUID=<UUID> none hfs rw,noauto to /etc/fstab and then ran sudo automount -vc to make the edits take effect.